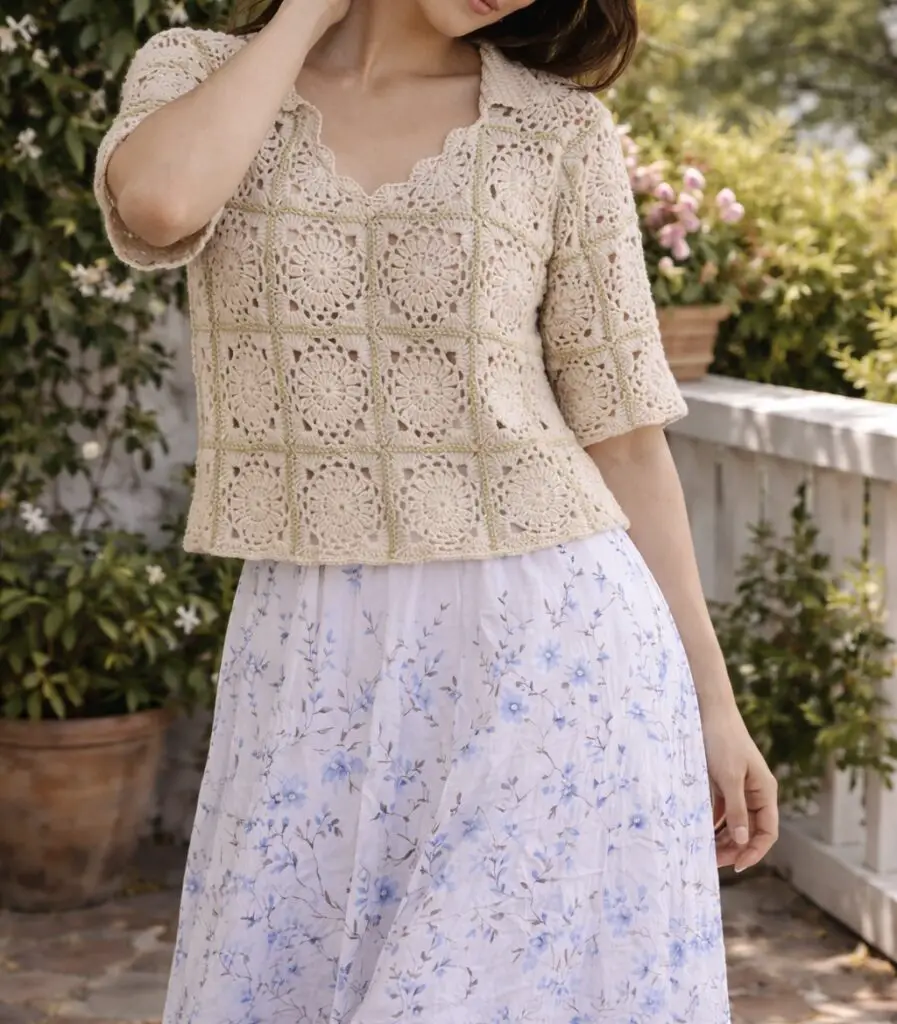
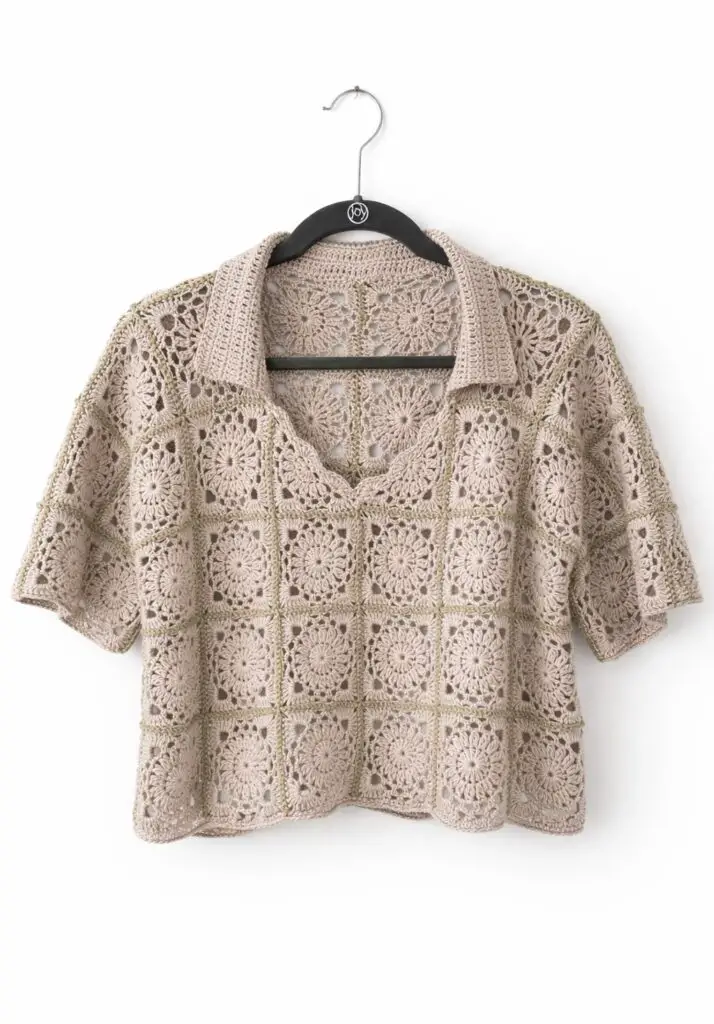
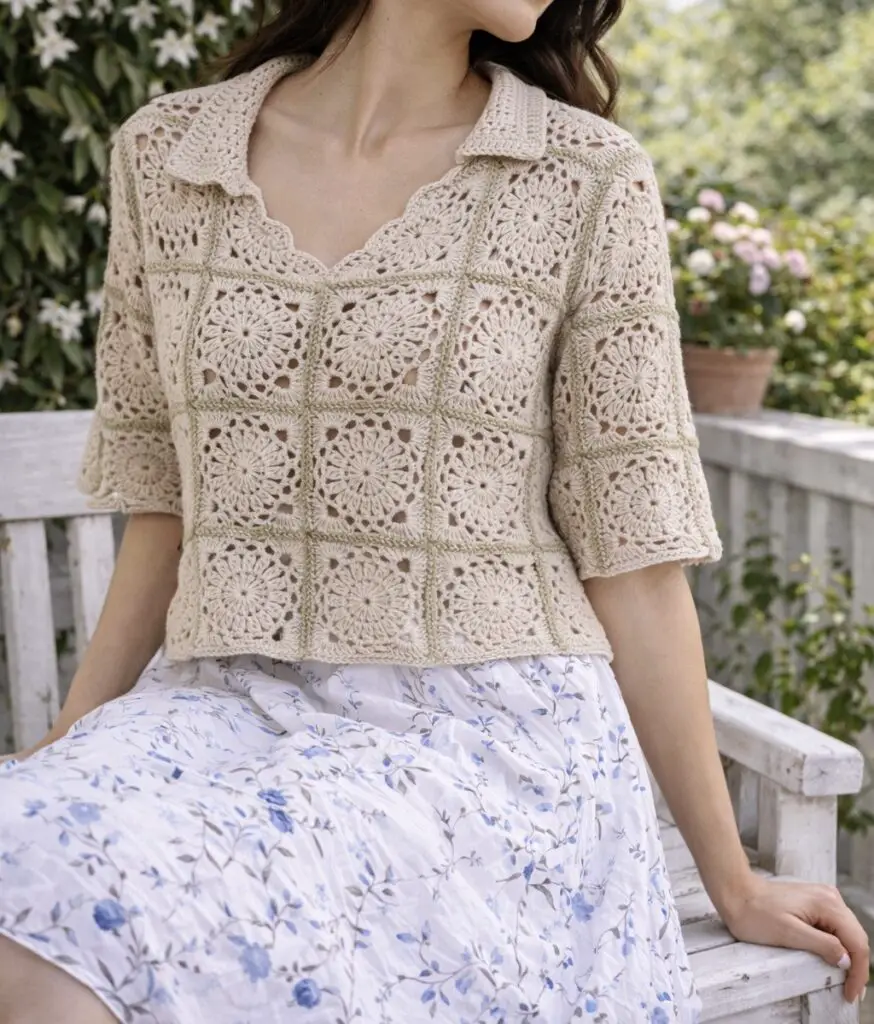
Granny Square V-Neck Top Crochet Pattern (XS–3XL)Looking for a modern, wearable crochet project that combines classic granny squares with a flattering silhouette? This granny square V-neck top is the perfect blend of vintage charm and contemporary style.Designed with simplicity and versatility in mind, this pattern uses lightweight yarn and 4” granny squares to create a breathable, stylish top that works beautifully for layering. Whether you’re a beginner ready to level up or an experienced crocheter looking for a relaxing project, this pattern is approachable, customizable, and size-inclusive.This pattern includes sizes XS through 3XL and uses a simplified 2-diagram system, making it easy to follow without overwhelming you with complicated grading.

✨ Why You’ll Love This Pattern
• Beginner-friendly granny square construction
• Lightweight and breathable design
• Flattering V-neckline using triangle motifs
• Relaxed, slightly oversized fit
• Size-inclusive (XS–3XL)
• Minimal shaping required
📏 Sizing & Fit
This top is designed with positive ease, meaning it has a relaxed, comfortable fit.
• XS: Oversized fit
• S: Relaxed oversized
• M: Relaxed (intended fit)
• L: Slightly fitted
• XL–3XL: Relaxed fit using extended layout
Note: Because this garment is made from motifs, the fit will vary slightly depending on your body shape and how your squares block.
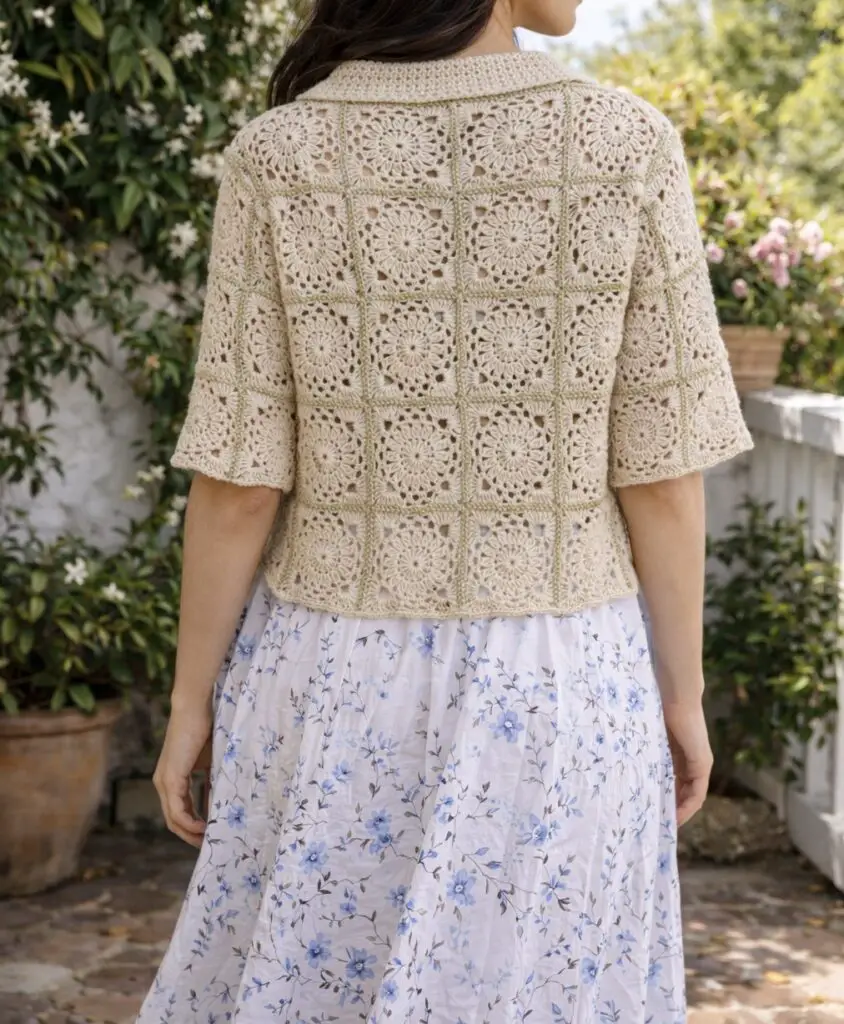
📊 Finished Measurements
• Granny square size: 4” x 4” (10 x 10 cm after blocking)
• Medium sample bust: approx. 40–44 inches
• Armhole depth: approx. 7 inches
• Length from underarm: approx. 11 inches
🧵 Materials
• Weight 3 (lightweight / DK) yarn
• 3.5 mm crochet hook
• Tapestry needle
• Scissors
• Stitch markers
📌 Gauge
1 granny square = 4” x 4” (10 x 10 cm) after blocking
⚠️ Blocking is essential for achieving the correct size and fit.
🧩 Pattern Structure Overview
This top is made by:
1 Crocheting granny squares
2 Making 2 triangle squares for the neckline
3 Joining squares into panels
4 Shaping the neckline
5 Adding collar and edging
To simplify sizing, this pattern uses two layout diagrams:
• Diagram 1: XS (S, M, L)
• Diagram 2: XL (2XL, 3XL)
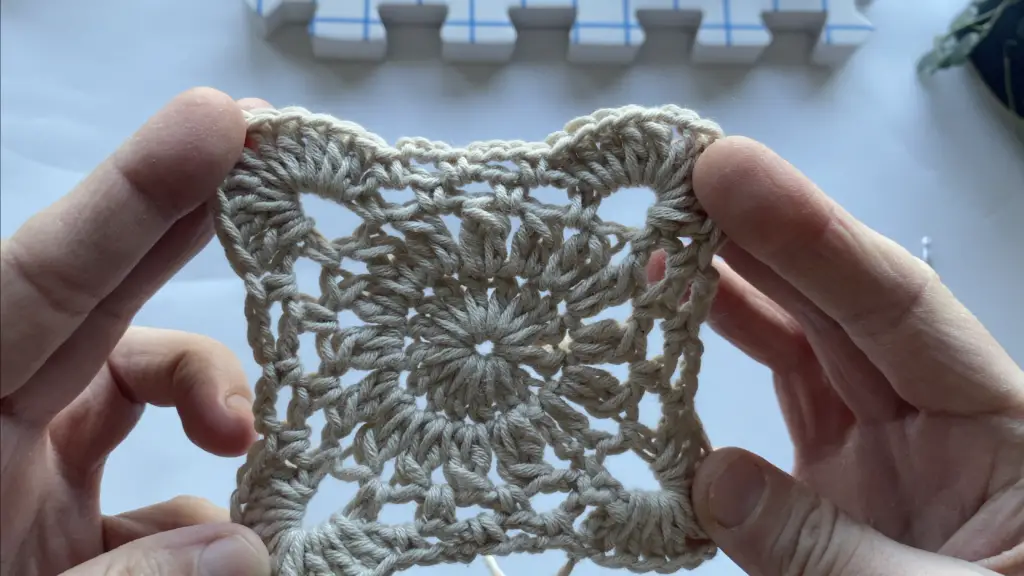
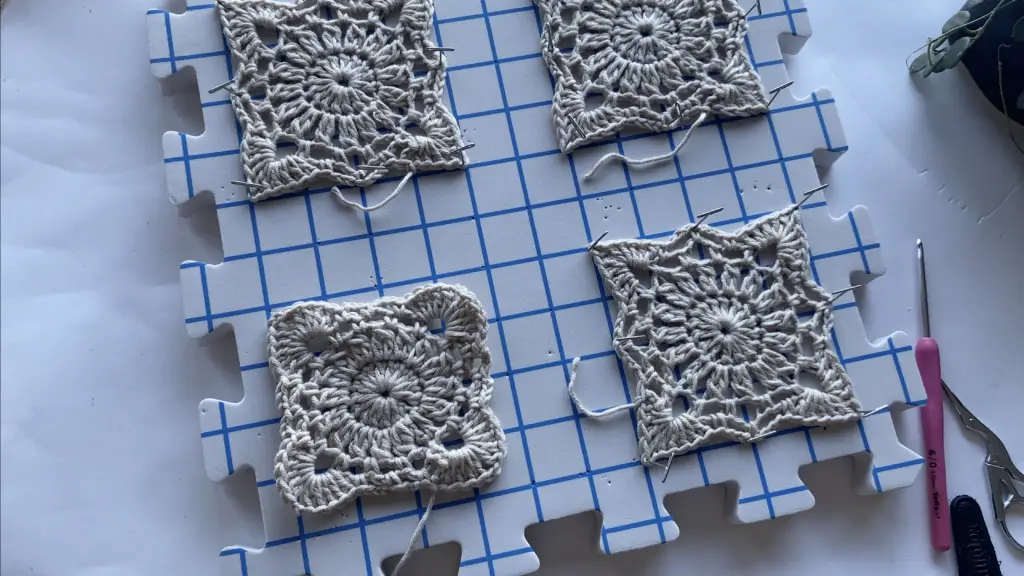
🧶 Granny Square Pattern
Make a slip knot and chain 4. Join with a slip stitch to form a ring. Chain 3.
Round 1:
Make 15 double crochet into the ring (16 total including chain 3).
Slip stitch to close.
Round 2:
Chain 3, make 1 double crochet in the same stitch.
Chain 2, double crochet 2 together in next stitch. Repeat around.
Chain 2, slip stitch to close.
Round 3:
Chain 5, single crochet in next stitch, (chain 3, single crochet in next stitch) 3 times.
Repeat around.
Slip stitch to close.
Slip stitch into next 2 chains.
Round 4:
Chain 3.
(4 double crochet, chain 2, 5 double crochet) in same space (corner made).
Single crochet in next space.
(Chain 3, single crochet in next space) 2 times.
(5 double crochet, chain 2, 5 double crochet) in next space.
Repeat around.
Slip stitch to close, chain 1, fasten off.
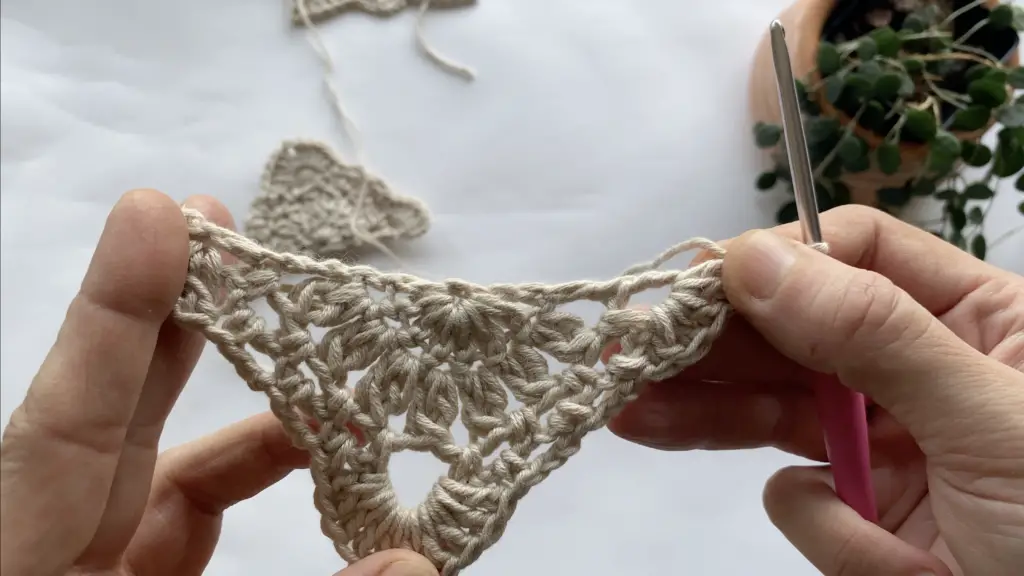
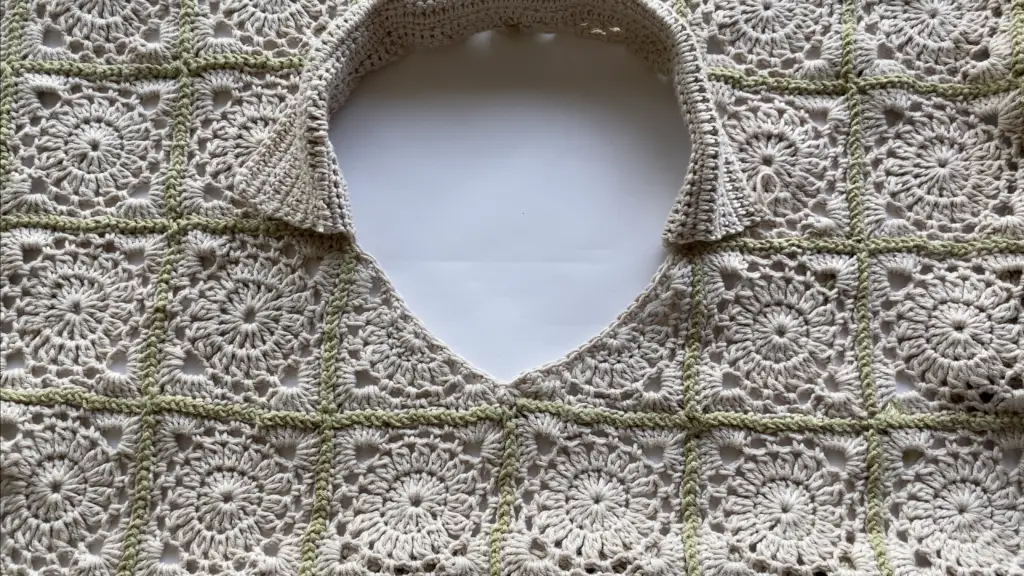
🔺 Triangle Granny Squares (Make 2)
These create the V-neck shaping.
Make a slip knot and chain 4. Join into a ring. Chain 3.
Row 1:
7 double crochet into ring (8 total).
Chain 5, turn.
Row 2:
Double crochet 2 together.
Chain 2, double crochet 2 together. Repeat across.
Chain 2, 1 double crochet in last stitch.
Row 3:
Chain 5, turn.
Single crochet in next space.
(Chain 3, single crochet in next space) 3 times.
Chain 5, single crochet in next space.
Chain 3, double crochet in last stitch.
Row 4:
Chain 3, turn.
4 double crochet in next space.
Single crochet in next space.
(Chain 3, single crochet in next space) 2 times.
(5 double crochet, chain 2, 5 double crochet) in next space.
Finish with 5 double crochet in last space.
Fasten off.
🧩 Layout Diagrams
XS (S, M, L) — Standard Layout
Use:
• 72 granny squares
• 2 triangle squares
This layout creates a relaxed, slightly oversized fit.
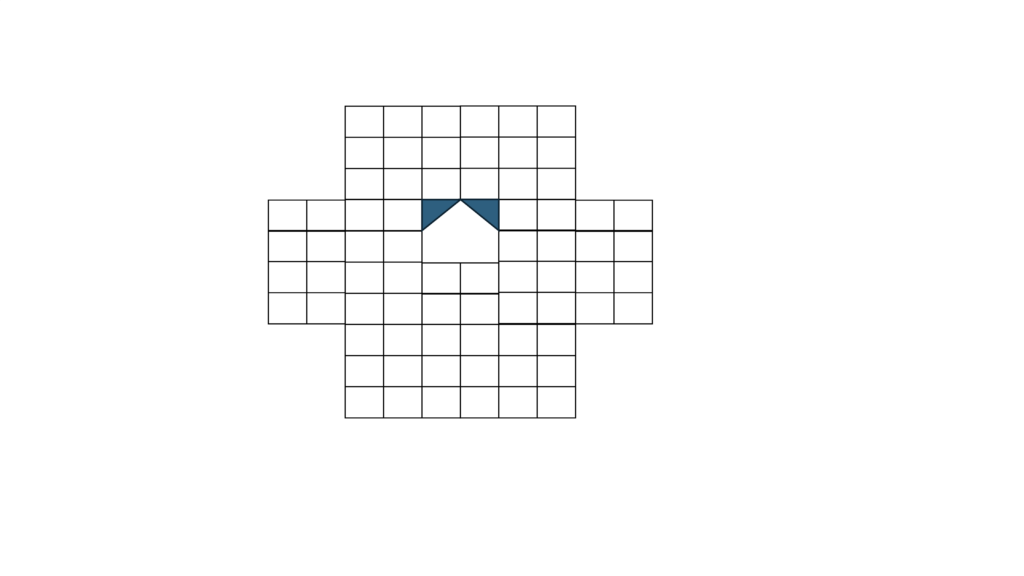
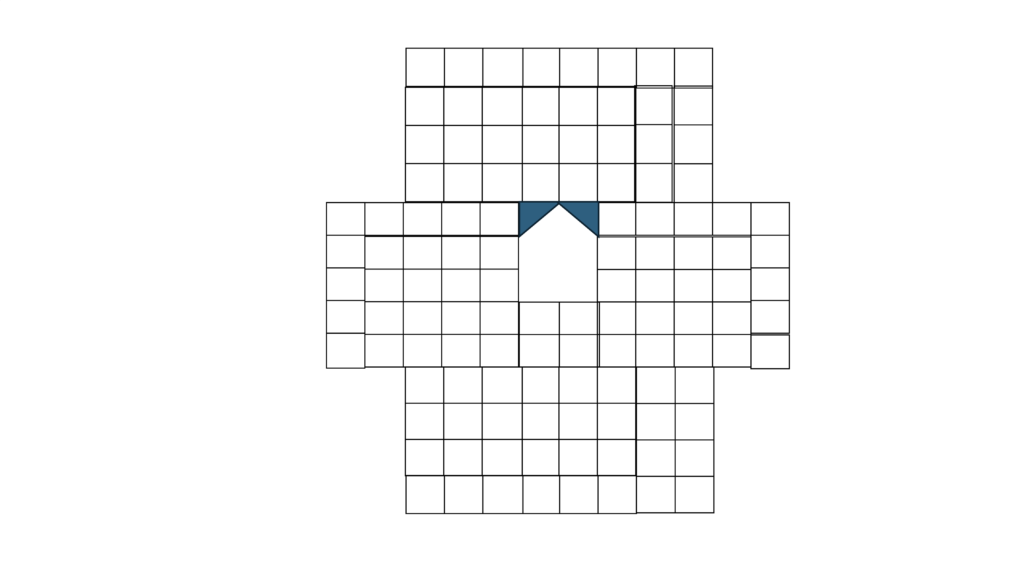
XL (2XL, 3XL) — Extended Layout
Use:
• 118 granny squares
• 2 triangle squares
This version adds width for a more comfortable fit in larger sizes.
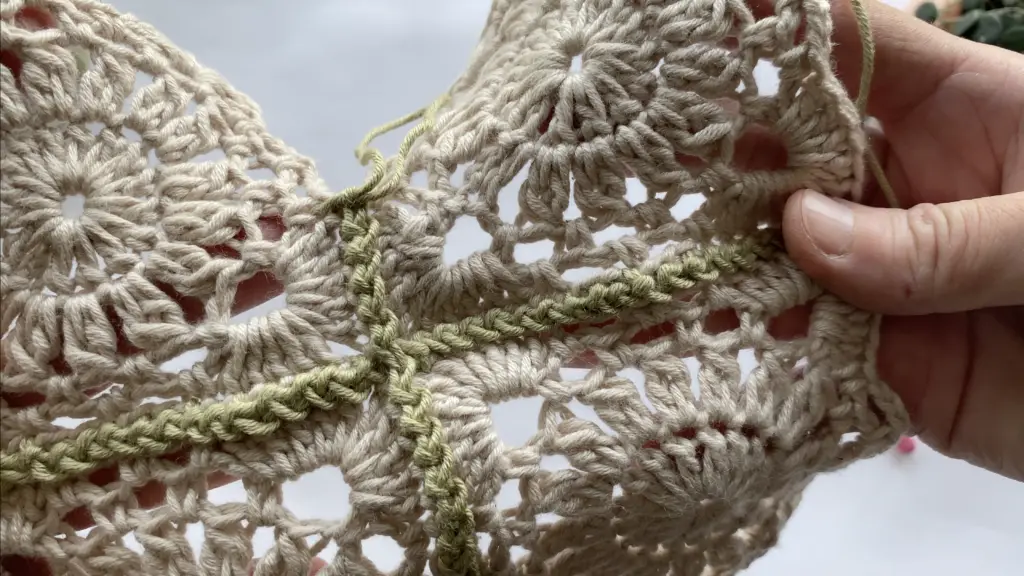
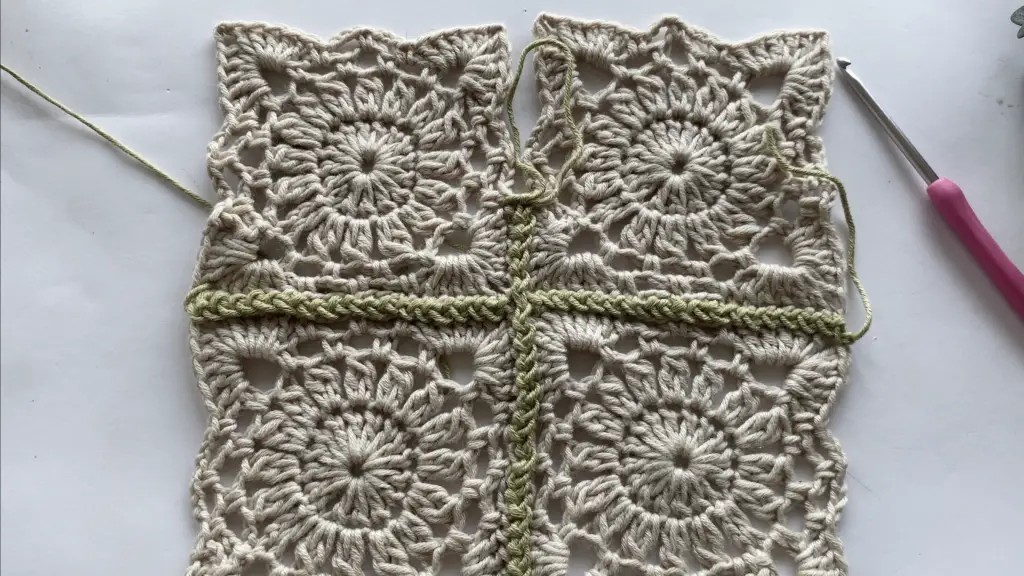
🪡 Joining the Squares
Attach yarn to the corner of one square.
• Slip stitch to the corner of the next square
• Continue slip stitching between squares
• Keep yarn positioned between motifs for a clean seam
Join:
• Squares into full panel
• Shoulder seams
• Leave armholes open
• Join sides after neckline
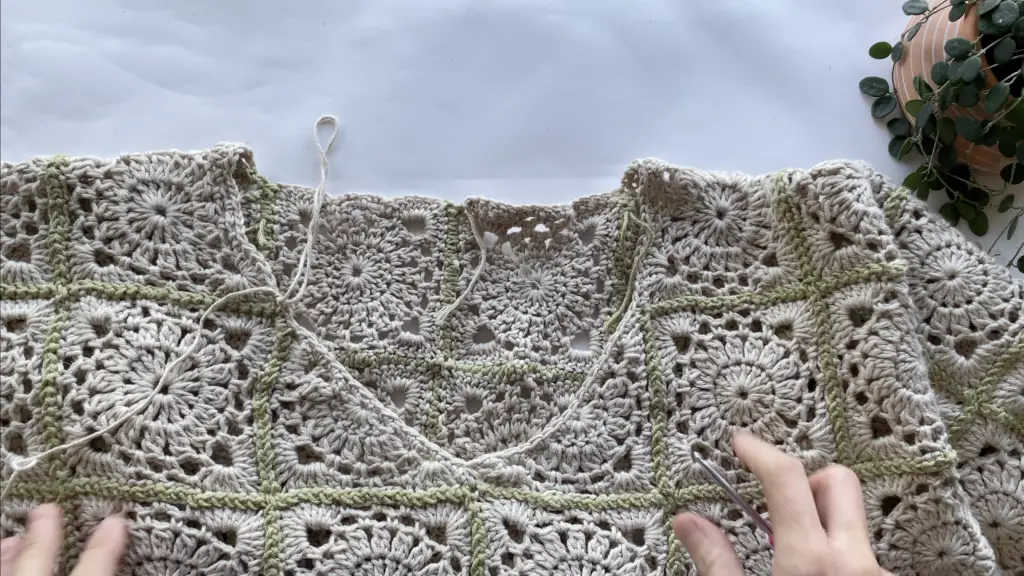
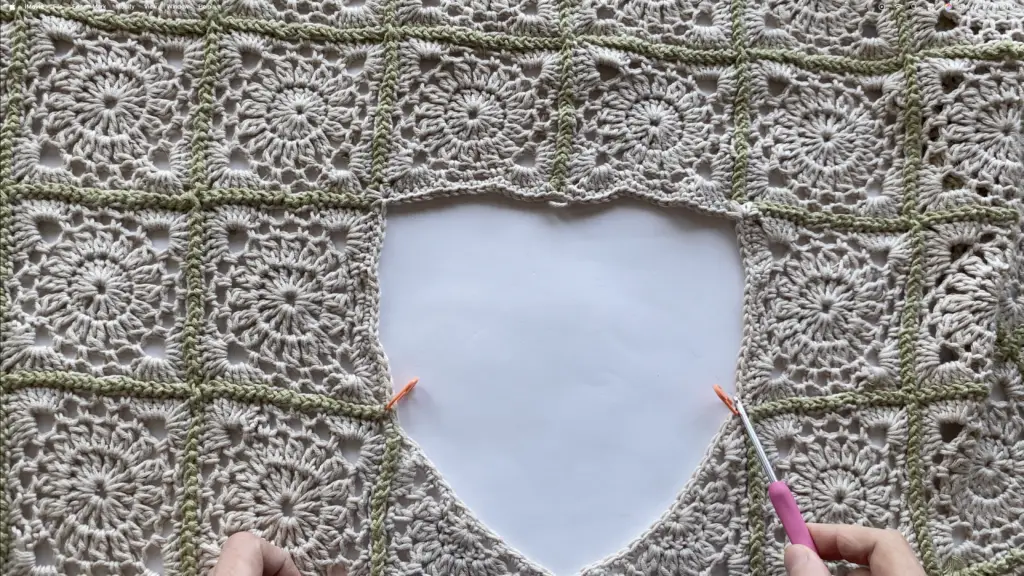
🔻 Neckline Shaping
Attach yarn at the back neckline.
• Single crochet in each stitch
• 2 single crochet in each space
• At corners: single crochet 5 together
• At V-point: single crochet 4 together
Approximate stitch counts:
• XS–S: ~96–104 stitches
• M: 110 stitches
• L–3XL: 118–140 stitches
Slip stitch to close and fasten off.
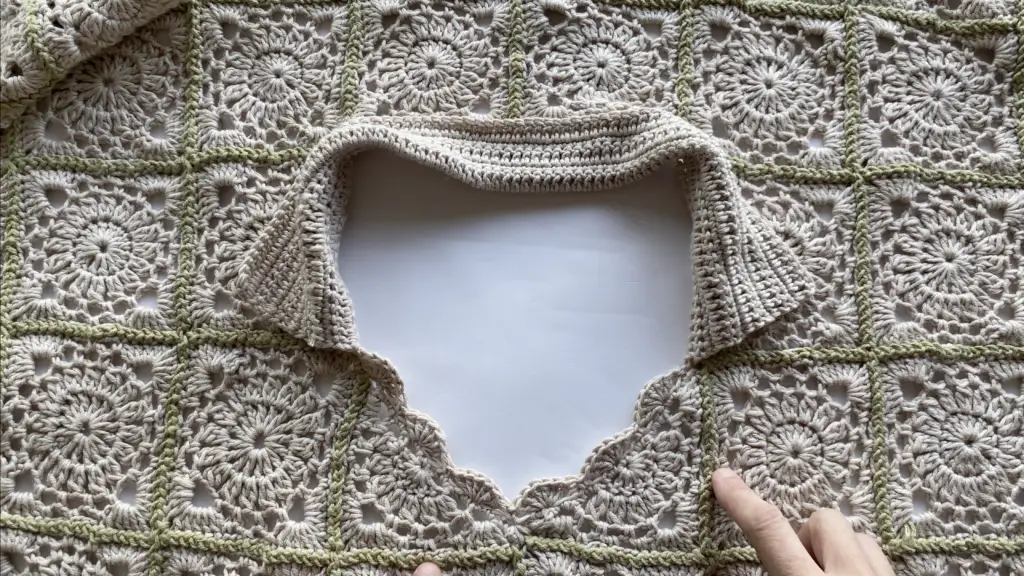
🧶 Collar
Place stitch markers to define collar section.
Work rows:
• Row 1: double crochet across
• Row 2: single crochet across
Repeat for 8–10 rows or desired width.
🌸 Scallop Edge
Attach yarn and work:
Skip 2 stitches, 6 double crochet in next stitch, skip 2 stitches, single crochet in next stitch.
Repeat across neckline.
Fasten off.
🧵 Bottom Edging
Attach yarn at hem.
• Single crochet in each stitch
• 2 single crochet in chain spaces
• Single crochet evenly across joins
Fasten off.
🧼 Blocking
Blocking is essential to:
• Achieve correct square size
• Align seams
• Improve drape
Lightly steam or wet block all squares before joining.
✨ Customization Tips
• Add rows of squares for more length
• Use cotton yarn for summer wear
• Adjust sleeve width by adding/removing side squares
• Try color-blocking for a modern look
📏 Customize Your Fit (Easy Granny Square Sizing Guide)
One of the best things about a granny square crochet top is how easy it is to customize the fit. While this pattern includes structured layouts for multiple sizes, you can also adjust the sizing to better match your body or preferred style.
This section will help you customize the width, length, and overall fit using simple calculations—no complicated math required.
🧶 Step 1: Measure Your Granny Square
Before making adjustments, crochet one full granny square and block it.
Your finished square should measure approximately:
4” x 4” (10 x 10 cm)
If your square is:
• Larger → your top will be bigger
• Smaller → your top will be more fitted
👉 Tip: Adjust your hook size if needed to match gauge.
📐 Step 2: Calculate Your Ideal Width
To customize the bust size:
1 Measure your bust (or desired finished width)
2 Divide that number by your square size (4”)
Example:
40” bust ÷ 4” = 10 squares total
That means:
• 5 squares for the front
• 5 squares for the back
👉 For a looser fit, add 1–2 extra squares
👉 For a more fitted look, subtract 1 square
📏 Step 3: Adjust the Length
To make your top longer or shorter:
• Add rows of granny squares → longer top
• Remove rows → cropped top
Each additional row adds approximately 4 inches in length.
👕 Step 4: Adjust Sleeve Width
Sleeves are created by the side extensions in the layout.
• Add more squares → wider, more relaxed sleeves
• Use fewer squares → more fitted sleeves
🔺 Step 5: Keep the V-Neck Balanced
No matter what size you make:
• Always use 2 triangle granny squares
• Keep them centered at the neckline
• Do not change their position
This ensures your V-neck keeps its clean, symmetrical shape.
🧵 Step 6: Test Before You Commit
For best results:
• Make and block a few squares first
• Lay them flat and check your measurements
• Adjust before joining all pieces
This will help you avoid resizing later.
💡 Pro Tip for the Perfect Fit
If you’re between sizes or want more control over sizing:
• Use a larger hook for a looser, drapier top
• Use a smaller hook for a tighter, more structured fit
Small adjustments can make a big difference!
✨ Final Note
This pattern is designed to be flexible and beginner-friendly. Whether you follow the standard layout or customize your own size, the granny square construction makes it easy to create a top that fits your style perfectly.
Take your time, enjoy the process, and make it your own!
📌 Share Your Make
If you make this top, I’d love to see it!
Tag your creations and share your color combinations for inspiration.
Happy crocheting! 🧶
Leave a Reply